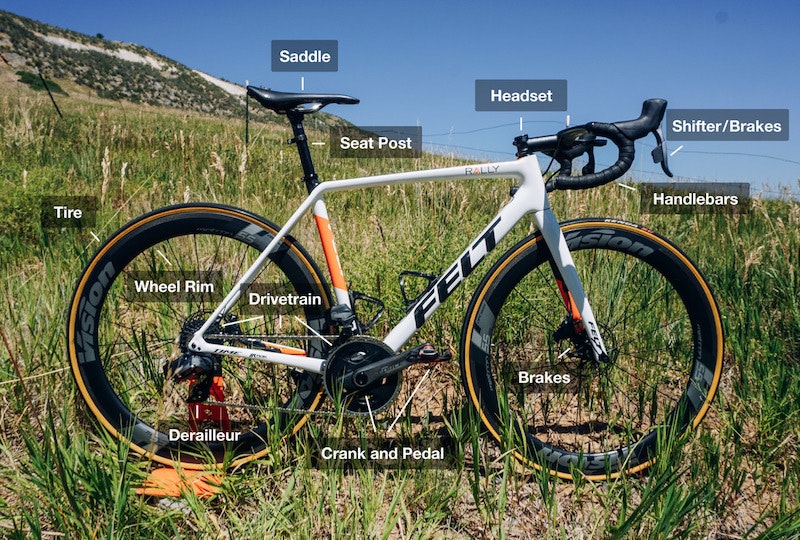
Fixing your bike can be daunting if you’ve never changed a tire before — or even pumped one up. While some repairs are best left to the professionals, basic maintenance skills can save you thousands of dollars and make riding your bike a lot safer and more fun. We asked Rally Cycling’s team mechanic Rick Barrow to share some of his best quick-repair advice. (Pro tip? Before you unpack his instructions, refer to the image above to learn the names of the various parts of your bike if you don't know them already.) Here are six how-tos to keep you riding.
How to...
Check Your Tire Pressure
Your weight compresses your tire and the inner tube inside it as you ride. Too-mushy tires can slow you way down, but overfilled ones can cause problems, too. “Tires with too much air in them mean less of the tire is actually in contact with the ground, making you more prone to sliding out and crashing in corners, especially wet ones,” Barrow explains. Under- and over-pumped tires can also put you at risk for flats.
Generally speaking, the heavier you are, the more air you’re going to want in your wheels. Less pressure can also help your tires absorb more bumps in the road. To check your bike’s recommended tire pressure range, look at the number — measured in pounds per square inch, or PSI—on your tire’s sidewall. Recommended pressure will differ wildly depending on the bike you’re using. A road bike’s tires can be inflated to 100PSI, while a fat bike with ultra-wide tires will happily roll along at a mere 10PSI. You’ll also want to consider the weather before you pump or deflate your wheels. Opt for slightly lower pressure in rain for a more stable ride.
Finally, eyeball your pressure often. On a road or mountain bike, take a look before every ride. For a commuter bike with bigger tires, checking the pressure once a week should do the trick.

Check the recommended PSI on your tires before pumping them up.
How to...
Troubleshoot Your Chain
Keeping your chain clean and lubricated can help it last longer. Spruce it up every few rides — or more often if you use your bike in wet, muddy conditions.
Liberally apply the chain degreaser on all sides, including the chainrings, cassette, and derailleur pulleys (see image, below). Allow the degreaser a few minutes to break down built-up grease and dirt, then rinse thoroughly with a hose. With the brush, scrub the chain, chainrings, and cassette with warm soapy water and again, rinse thoroughly. Dry the chain with a clean rag, then lightly slick it with a bicycle-specific chain lubricant. Allow to soak in for a few minutes, then wipe away any excess with your rag.

A bike’s drivetrain includes all the parts it needs to move, including the chain, chainring, sprockets, cogset, and derailleur, above.
It’s also good to know how to reattach a slipped chain. Riding and shifting gears can sometimes cause your chain to fall off your front chainring on your crank, the lever that connects your pedal to your bike. To fix it, pull down on the derailleur cage (see image) to give the chain more slack. Then gently pull the chain back onto the front chainring. Once it’s in place, lift the rear wheel off the ground and rotate the pedals forward with your hand to make sure the chain is fully back in place.
How to...
Solve Creaks and Wobbles
Bike feeling shaky? Pull out your multi-tool, because it’s likely something has come loose. Start by checking your headset at the bolt located in the middle of your handlebars, where your handlebars meet your bike’s frame. If that feels good, next, see that your seat post bolt is tightened, and after that, that your pedals are secure and spinning freely. Squeaky ones will benefit from a small spritz of WD40. If you’re still trying to find the source of the sound, try your water bottle cage. Bolts on these often come loose over time due to inevitable bumps in the road.

Constant creaks can put a damper on even the most beautiful rides.
How to...
Adjust a Stuck Seat
Setting your bike down on its side, rather than using a kickstand, can sometimes tilt the seat sideways, which can lead to knee pain and other discomfort while you’re pedaling. “It doesn’t take much to get a seat knocked out of alignment,” says Barrow. To realign your seat or to reset its height, use the Allen key to slightly loosen the bolt at the base of the post connecting the saddle to your bike frame. Gently thump the side of the saddle with your fist to realign it, and check from behind to ensure that it’s on straight. To adjust your seat height, hop on your bike and see how much your leg straightens at the bottom of your pedal stroke. Your knee should be only slightly bent –– in other words, almost completely straight –– when your foot is flat on the pedals. Once you’re done adjusting, re-tighten your seatpost using the Allen key and pedal away.

You'll need an Allen key to realign your seat, or reset its height.
How to…
Pack an Emergency Kit
Every cyclist — new or veteran — should have a well-stocked emergency repairs kit. At home, you'll want to keep a cleaning kit handy with rags, a brush, a bucket, a degreaser for your chain, as well as some chain lubricant. Barrow also recommends buying a floor pump with an easy-to-read gauge for setting tire pressure. On rides, take a strong mini-pump for flats, a multi-tool with Allen (or Hex) keys, a torque wrench for tightening bolts, tire levers for taking tires off wheel rims, two spare inner tubes, and a small tire patch kit. Gear up, and you'll be good to go.
MOLLY HURFORD
Rally Health